
I'm crazy, I know. I have this thing where I, umm, take on a new hobby and I find the biggest project I can to sink my teeth into first. Ridiculous and way more stressful than it should be but I've always done it. I figure if I could do this, I could do any project I put my mind too. Looks like that holds true here!


For this project you will need the following items:
- an old dresser you would like to repurpose
- paint or stain of your choice [not shown]
- two 2 x 10 x8, cut in half to your specific length dimensions [not shown]
- medium and fine grit sandpaper sponges
- power drill and drill bit set [ you will need drill bits and a woodboring spade drill bit]
- power sander and sandpaper pads, 60 grit [not shown]
- wood screws [these screws had a special head for added torque and it came with the appropriate bit]
- wood filler, matching your wood
- gorilla wood glue
- Butcher's Block [Watco was the brand offered at Lowe's and it worked great!]
- hammer
- two way level

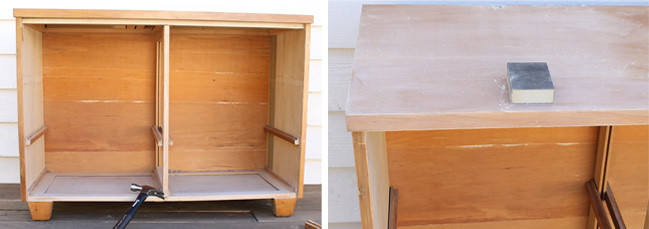
Step One: Take out all your drawers and grab your hammer. The way our dresser was built, all we needed to do was pull off the side bars that the drawers rested on.* After you have removed any pieces inside that you don't need. Grab your sandpaper and go to town. If you are re-staining you will need sand off the entire stain or clear coat existing. Since we are just painting, we just gave it a good once over, roughing up the surface so paint would stick.
*We only took off the top 4 initially because we had planned on putting two drawers on the bottom and creating a shelf. Turns out the pans were longer hanging than expected and I'm actually much happier the way it turned out!
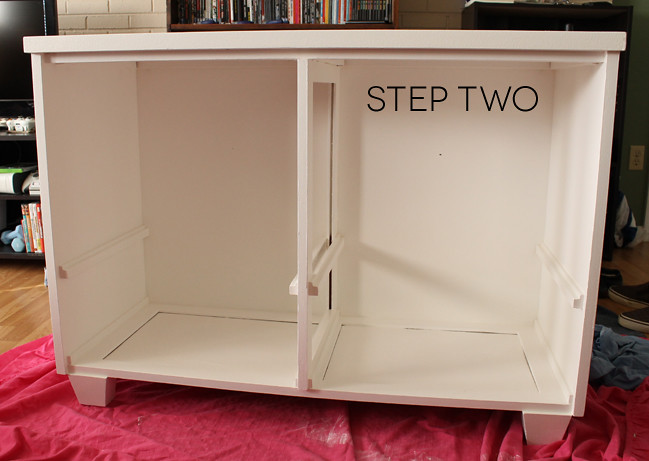
Step Two: PAINT! PAINT! Oh yea, MORE PAINT! Depending on the wood surface you may need multiple coats. We used a paint roller and tray but you can certainly try spray paint if it is easier for you situation. I think I put a total of 4-8 coats on any one section because the wood had never had a stain or paint so it soaked up EVERYTHING. And I was painting it white so the slightest see-through section sticks out like a sore thumb.

Step Three: Take your pre-cut wood purchased from your local hardware store. They will cut it for you, free of charge. Use the back side of a hammer to remove and tags or staples in the board.
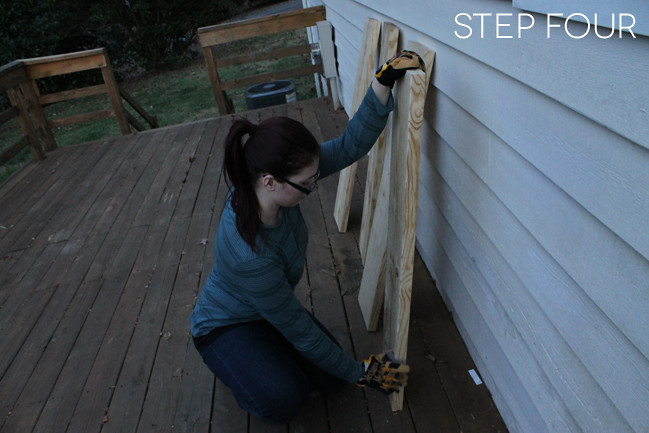
Step Four: Grab your sandpaper again and hit all of the edges and corners to reach your desired look. I just smoothed out the edges and got rid of any splinters because I wanted it to look clean cut. But rounded edges and corners could look great also!
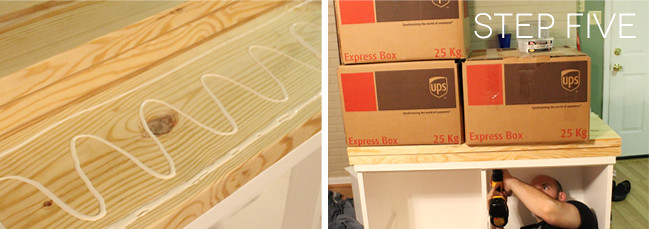
Step Five: Once you have your tops sanded and wiped down clean, take a few minutes to play Jenga with the boards and find out exactly which pieces are best where. They will all be similar but not the same so some will lay better together than others. Once you have decided on the placement use wood glue on the table top and between the two new layers you are adding on. We used some packed boxes around the house as weights while the glue dried. While this happened, James went in and screwed everything together from the bottom.*
*Be sure to plan out where you are placing the under screws and top screws before this process starts so that you aren't screwing from the top and bottom in the exact same place.
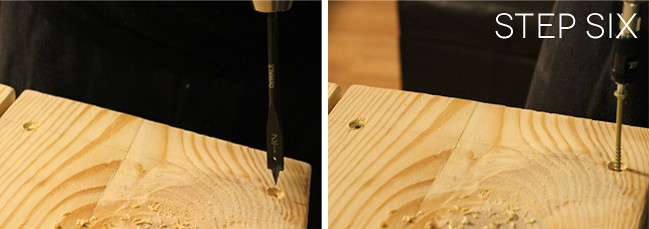
Step Six: By the time you have finished screwing the underside your glue should have set (20-30 minutes) and you can remove the weights. Then you will want to take your 1/2 inch woodboring spade drill bit (shown on the left) and drill until you have about 1/4 in recess in the top of your table where you want the 4 screws to go. We placed 8 total. 2 on each end of each top board. Now that your hole is ready, put in the wood screw.


Step Seven: Add your wood filler that matches your top to the screw holes and any gaps in the surface. Don't worry if it is lumpy or not perfectly flat because after it has dried about 15-30 minutes then you can go sand the top until it is level.

Step Eight: Once your top has been leveled and you are happy with the finish clean all of the dust off the top and sides of the dresser. Now it is time to cover your topper in Butcher's Block. This is an FDA approved, food safe coating for your wood that prevents your wood from soaking up water and other things when working on it. It can be used to coat cutting boards or wooden utensils and bowls, also. Follow the instructions on the product label exactly.

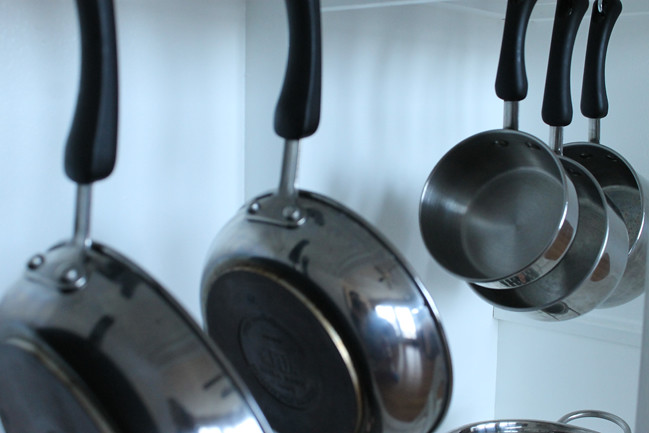
Step Nine: Once your top has completely cured and is ready to use go in and mark underneath where you want to place the hooks to hold your pots and pans. Use a drill bit slightly smaller than the width of the hook you are installing and drill about 2 inches. Then screw in your hooks by hand. It will be easier to install but the threads will still hold tightly into the wood.
I have always loved the ideas of hanging pots and pans in your kitchen but I'm too tall... I would ALWAYS walk into them. This serves a great purpose for us that is decorative and helpful. (We have lots of cabinets but none are the correct size to hold pots and pans. Go figure!

Lastly... ENJOY! If you have done a project like this it is a labor of love and you use it every day! I know I do. It is my island, my work bench. My photo spot. Everything! It is definitely the greatest project decision I ever made :)
xoxohannah
Note: I did not receive any compensation or free products by any of the companies used in this tutorial. These are all supplies we had or purchased to use in the making of this repurpose. The recommendations or tips given are based solely on my experience with these products and were not influenced by the companies in any way. I cannot speak for all experiences, just my own. Thanks!
Oh my goodness!!! It's BEAUTIFUL. Y'all did a fantastic job. :D
ReplyDeleteAWESOME! you did a great job Hannah. Seriously a great DIY. major props to you. between this and your boots....I'm quite jealous :).
ReplyDelete-grace
http://herumbrella.com
WOW! What an awesome idea Hannah! My pots and pans are such a mess inside my cabinets, it would be so nice to have them hang from something. If I had the space for an island in my kitchen, I would so do this!
ReplyDelete-Amanda k.
Oh wow! That looks awesome! You should be very proud of yourself! I can't even put together 4 step shoe racks without getting annoyed!
ReplyDeletetasteslikelove.blogspot.com
A job well done! It looks great, and totally matches your cabinets! :)
ReplyDeletexo, Samantha
I am even MORE impressed now that I've seen how you did it. I know I've already told you this but I LOVE it! You did such an amazing job & Jack & I are considering trying this ourselves. Serious kudos to you chica, I am so impressed. I wish we lived closer so we could work on projects together! Can't wait to see more projects from you.
ReplyDelete<3
This is so cool! I would have never thought to use something like dresser. xD You did an amazing job! Excellent work. d^__^b
ReplyDeletewow this is lovely!!
ReplyDeleteWhat an awesome project! That's very creative. I wandered over here by way of Angie's blog; Lariats and Lavender. =)
ReplyDeleteNo waaaaaaay! This is so cool! I would love one of these for my kitchen, and I would put bins underneath to sort my recycling! What an amazing project!
ReplyDeleteThis is great! I love repurposing furniture too :)
ReplyDeleteWow, you did an awesome job!
ReplyDeleteThis. Is. AWESOME!!!!
ReplyDelete